Image manipulation recipes in Pillow
Categories: pillow

In this article we will look at some useful ways to use pillow to perform image manipulation such as resizing or rotating images. These techniques are particularly useful for batch processing images, for example preparing incoming images on a webserver. This article also provides an introduction to the pillow library.
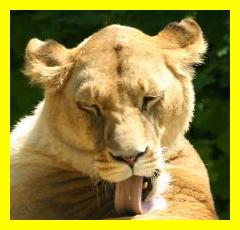
Here is our test image:

Reading and writing images
Reading and writing images with pillow is very easy, using the functions in the PIL.Image module. Here we will open a JPEG image file, display it in a window, and save a copy of the image as a GIF file:
from PIL import Image

im = Image.open('lioness.jpg')
im.show()
im.save('lioness.gif')
The open function reads an image from disk. It can accept a file name (string), a Path object or an file object (eg created using the open function to create a readable file). It will determine the type of file automatically by looking at the file content.
open returns an Image object.
The show function (a method of the Image object, like many of the functions described here) pops up a window to display the image. It is useful for debugging. The main limitation is that after creating the window, your program no longer has control of it, so you have to close it manually. This means it isn't all that useful in an actual application, but it can be handy during development.
The save function writes the image to file. As with open it can accept a file name, Path object or a file object that has been opened to write.
save will use the file extension to determine the type of image file required, for example the .gif extension creates a GIF file. Alternatively you can specify the file type explicity as a second parameter:
im.save('lioness.gif', 'GIF')
Pillow supports many common image formats, including BMP, GIF, JPEG, PNG, TIFF. Some of these formats have optional extra parameters that are format dependent and can be passed in to the save call. We won't cover these details here, refer to the pillow documentation.
openandsavecan throw andIOError, you should normally handle that in your code. It is left out of the examples for brevity.
Image information
You can get image information form the attributes of the Image object:
from PIL import Image

im = Image.open('lioness.jpg')
print(im.filename)
print(im.format)
print(im.mode)
print(im.size)
print(im.width)
print(im.height)
print(im.palette)
print(im.info)
Giving the following result:
lioness.jpg
JPEG
RGB
(600, 450)
600
450
None
{'dpi': (180, 180), 'progression': 1, 'exif': '...',
 'jfif_density': (180, 180), 'progressive': 1,
 'jfif_unit': 1, 'jfif': 257, 'jfif_version': (1, 1)}
Most of these are self explanatory. size is a tuple containing the width and height. The palette is only available for palette based images. info is a dictionary of image parameters that are format specific.
These attributes are read only, but they will be altered by some of the functions below - for example the resize function will alter the width and height attributes.
Resizing images
You can resize an image using the resize function:
from PIL import Image

im = Image.open('lioness.jpg')
small_im = im.resize((300, 150), resample=Image.BICUBIC)
small_im.save('lioness-small.jpg')

resize accepts a size parameter, a tuple (or list) containing the required width and height of the thumbnail in pixels. It will resize the image to fit within the specified size. If the aspect ratio (the ratio of width to height) of the original image is different to the requested aspect ratio of the resized image, you will get some distortion as the image is stretched to fit a different shape.
You can avoid this by making sure the aspect ratios are the same, or by using the thumbnail function, below.
The function also has an optional resample parameter, that sets the resampling filter. It can be NEAREST, BOX, BILINEAR, HAMMING, BICUBIC or LANCZOS. These are similar to the options you might see in imaging application like Photoshop or GIMP. The list of filters is ordered from lowest to highest quality, but the higher quality options tend to be a bit slower. BICUBIC is probably the best option for general use (the default is NEAREST, but a modern computer can run BICUBIC pretty quickly and the quality improvement is quite noticeable).
resize also has an optional parameter box that specifies a region to be resized. The image is first cropped to the box, and the result is resized. The crop box is specified by a 4-tuple in exactly the same way as the crop function below.
Creating thumbnails
You can create a thumbnail using the thumbnail function:
from PIL import Image

im = Image.open('lioness.jpg')
im.thumbnail((150, 100))
print(im.width, im.height)
im.save('lioness-thumb.jpg')

thumbnail accepts a size parameter, just like resize. It will resize the image to fit within the specified size, but without altering the aspect ratio.
In this case, our original image is 600 by 450 pixels. Our required thumbnail size is 150 by 100. The actual thumbnail size we get is 133 by 100 - this is the largest possible thumbnail that fits within the required size while maintaing the original aspect ratio of 4:3.
thumbnail also has an optional second parameter, resample, just like the resize function, but in the case of thumbnail it defaults to BICUBIC, which is fine for thumbnails, you should rarely need to change it.
The other diference with thumbnail is that it operates in place on the image itself (resize creates a resized copy of the original).
Despite its name, there is no requirement for the thumbnail to be small - you can set any size, and it can be bigger than the original image.
thumbnailis just a special version ofresizethat preserves aspect ratio.
Cropping images
Cropping an image means cutting out a rectangular region of the image, without resizing it. Suppose you wanted to create a new image containing just the face of the lioness, showing just this part of the image:

The upper left of the rectange is at (340, 20) pixels (measured from the top left of the image).
The rectangle itself is 220 wide by 210 high. That means the bottom right corner is at (550, 230).
crop requires 4 values - the top, left, bottom and right values of the rectangle:
from PIL import Image

im = Image.open('lioness.jpg')
crop_im = im.crop(box=(340, 20, 560, 230))
crop_im.save('lioness-crop.jpg')

Adding a border
Sometimes you might want to increase the size of an image, without rescaling it, by adding a border (padding) around it. This is kind of the opposite of cropping. An easy, flexible way to do this is:
- create a new blank image of therequired size and colour
- paste your image into the middle of it
Here is the code to add a 10 pixel border around an image:
from PIL import Image

im = Image.open('lioness-crop.jpg')
border_im = Image.new('RGB', (im.width+20, im.height+20), 'yellow')
border_im.paste(im, (10, 10))
border_im.save('lioness-border.jpg')
To create the new image we use Image.new. The image mode is RGB - you can use a different mode such as RGBA (RGB with an alpha channel), or L (greyscale), or see the pillow documentation if you need to use a less usual type of image.
The size of the image is set to 20 pixels bigger than the original image, because we are adding a 10 pixel border around the edge. We set the colour of the image to yellow (see the section on colours next).
Next we use paste to copy our original image into the yellow image. We place it at (10, 10) relative to the top left of the image. This leaves a 10 pixel border around the whole image.
Pillow also has an
expandfunction that can add a border in one step. The technique shown here is more flexible because it allows you to use different border widths for top, bottom, left and right.
Colours
Pillow allows you to specify colours in various ways, very much like HTML/CSS:
- '#rrggbb', eg '#00FF00' is pure green. It also allows the shorter variant '#0F0'.
- Standard CSS colour names, eg 'green'
- rgb functions, eg 'rgb(0, 255, 0)' or 'rgb(0%, 100%, 0%)'
- hsl functions.
This is covered in more detail in the RGB colour section.
Rotating and flipping images (transpose)
The transpose function covers all variants of flipping or rotation by multiples of 90 degrees:
from PIL import Image

im = Image.open('lioness-crop.jpg')
trans_im = im.transpose(Image.ROTATE_90)
trans_im.save('lioness-transpose.jpg')

The possibilities are:
- ROTATE_90, ROTATE_180, ROTATE_270 - rotate the image counter-clockwise by 90, 180 or 270 degrees
- FLIP_LEFT_RIGHT, FLIP_TOP_BOTTOM - flip the image about the vertical or horizontal axis
- TRANSPOSE - flip the image about the major diagonal (the diagonal from the top left to the bottom right)
- TRANSVERSE - flip the image about the minor diagonal (the diagonal from the bottom left to the top right)
Join the GraphicMaths/PythonInformer Newsletter
Sign up using this form to receive an email when new content is added to the graphpicmaths or pythoninformer websites:
Popular tags
2d arrays abstract data type and angle animation arc array arrays bar chart bar style behavioural pattern bezier curve built-in function callable object chain circle classes close closure cmyk colour combinations comparison operator context context manager conversion count creational pattern data science data types decorator design pattern device space dictionary drawing duck typing efficiency ellipse else encryption enumerate fill filter for loop formula function function composition function plot functools game development generativepy tutorial generator geometry gif global variable greyscale higher order function hsl html image image processing imagesurface immutable object in operator index inner function input installing integer iter iterable iterator itertools join l system lambda function latex len lerp line line plot line style linear gradient linspace list list comprehension logical operator lru_cache magic method mandelbrot mandelbrot set map marker style matplotlib monad mutability named parameter numeric python numpy object open operator optimisation optional parameter or pandas path pattern permutations pie chart pil pillow polygon pong positional parameter print product programming paradigms programming techniques pure function python standard library range recipes rectangle recursion regular polygon repeat rgb rotation roundrect scaling scatter plot scipy sector segment sequence setup shape singleton slicing sound spirograph sprite square str stream string stroke structural pattern symmetric encryption template tex text tinkerbell fractal transform translation transparency triangle truthy value tuple turtle unpacking user space vectorisation webserver website while loop zip zip_longest