Pong game using Pygame - step 2
Categories: pygame
This is the second article in a series where we will develop a complete game of Pong using Pygame.
In the previous step, we created a window and displayed the bat and ball, with no animation.
In this step we will animate the ball, making it move and bounce off the edges of the game window. We will also see how to control the speed of the gameplay, so the game behaves in a similar way on fast or slow computers. But before that, we will tidy our code up a bit to get rid of all the random global variables.
The code for this article can be found on github, and the resources are here.
Code so far
Here is the code we developed in step 1:
import pygame as pg
from sprites import Ball, Bat

# Setup game

screen_width = 640
screen_height = 480

# Initialise pygame
pg.init()

# Set display size
screen = pg.display.set_mode((screen_width, screen_height))

# Set window title
pg.display.set_caption('Pong')

# Create sprites

ball_sprite = Ball((100, 200))
bat_sprite = Bat((200, 400))
all_sprites = pg.sprite.RenderPlain()
all_sprites.add(ball_sprite)
all_sprites.add(bat_sprite)

# Game loop

running = True

while running:

    # Check all events in queue
    for event in pg.event.get():

        # If a quit event occurs, reset running flag
        if event.type == pg.QUIT:
            running = False

    screen.fill((0, 0, 0))
    all_sprites.draw(screen)
    pg.display.flip()
Adding a Game object
The original code defines quite a few variables, such as the screen_width, screen_height, running flag, and others. For more complex games, we will often add even more variables.
This can get a bit messy and difficult to manage. It might be a good idea to gather all these variables into a single place. This has a couple of advantages:
- We can see at a glance what variables we have.
- We can pass easily the values into any function that might need them.
A good way to group these variables is to create a game object. This is an object that holds all the important variables that relate to the current state of the game.
We saw in step 1 that in order to create an object, we first need a class (a kind of template for the object), and then we can create one or more objects based on the class. That is exactly what we will do to create our game object. Here is the code:
from dataclasses import dataclass

@dataclass
class Game:
    screen_width = None
    screen_height = None
    left = None
    right = None
    top = None
    bottom = None
    ball_sprite = None
    bat_sprite = None
    all_sprites = None
    running = None

game = Game()
We first create a class called Game. This class holds all the game-related variables from the previous code plus a few extra we will explain later (left etc).
Then we create an object called game that has the class Game.
The Game class is a special type of class called a dataclass. The @dataclass notation (called a decorator) tells Python to treat the class as dataclass. This allows us to simply declare all the variables we want inside the class. The dataclass decorator will automatically add the boring extra code required to initialise the class with these variables. It just makes the code shorter, easier to read, and less tedious to write.
Notice that we need to import dataclass from the dataclasses module. This requires Python 3.7 or later.
Now that we have our game object defined, we can access the values, for example, the screen_width like this:
game.screen_width = 640
Moving the ball
Part of what we will be doing in this tutorial is making the ball move, so let's take a closer look at that.
The position of the centre of the ball is measured as the number of pixels it is from the top left of the game window. Here is the ball at position (100, 200):
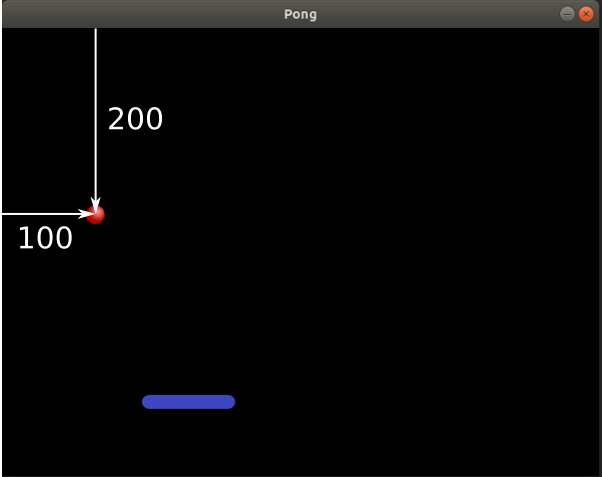
When the game is running, the main loop executes many times a second (typically 60 times a second). Each time through the loop, we move the position of the ball slightly and redraw it. Since the ball is being redrawn so quickly, our eyes see it as a continuous motion.
In this case, we might move the ball by 1 pixel to the left and 1 pixel down every frame, the ball would appear to move at an angle as shown by the diagonal green arrow:
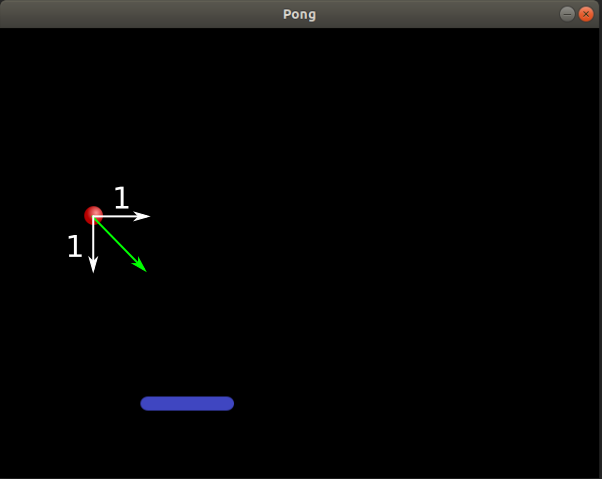
We might say that the ball has a direction of 1 in the x axis and 1 in the y axis.
We also need to handle the case of the ball hitting the side of the screen. We can make the ball bounce off the side by reversing the direction in the x or y axis depending on which edge. For example, if the ball hits the right edge, the x component of its direction is made negative, causing the ball to bounce as shown:
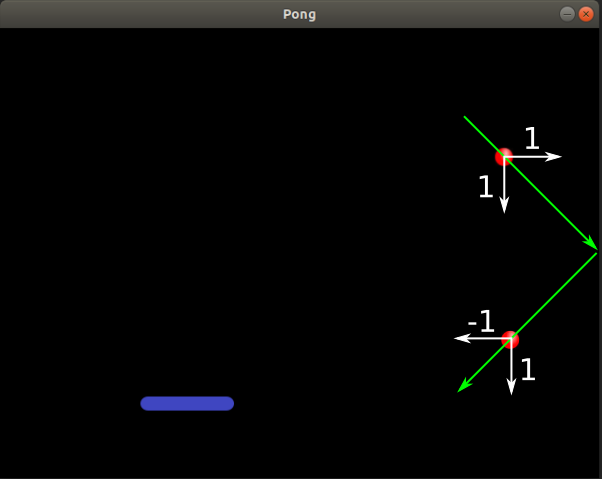
After the collision, the ball will have a direction of -1 in the x direction and 1 in the y direction.
Marking the window edges
In order to make the ball bounce off the edges of the game window, we need to know when the ball hits the edges.
Pygame can automatically detect collisions between different objects, and we will use this functionality to detect when the ball hits an edge.
To do this we will create 4 rectangles around the edges of the outside of the game window:
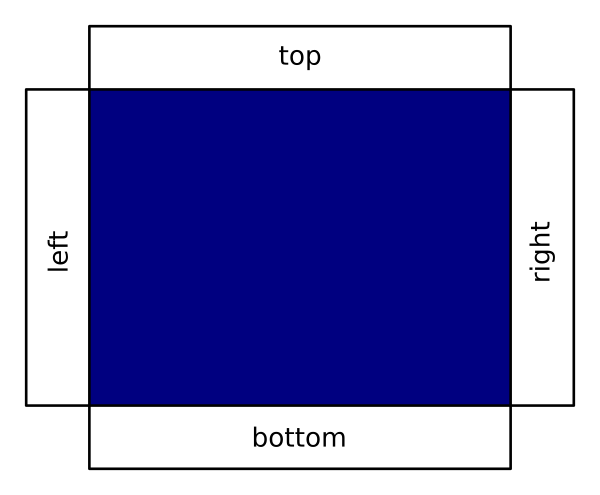
The rectangles are created like this, and are stored in the game object:
game.left = pg.Rect(-100, 0, 100, game.screen_height)
game.right = pg.Rect(game.screen_width, 0, 100, game.screen_height)
game.top = pg.Rect(0, -100, game.screen_width, 100)
game.bottom = pg.Rect(0, game.screen_height, game.screen_width, 100)
A rectangle isn't s visible element, it just defines an area of the screen. In this case, all the rectangles are just outside the screen area. For example, the left rectangle is positioned with an x coordinate of -100, and a width of 100, so its right-hand edge just touched the left side of the screen.
Measuring time with a clock
We now have a strategy for updating the ball position and making it bounce. We will implement this in the update method of the ball sprite object (we will cover that shortly).
We need to continuously call the update method in the game loop so that the ball position changes frequently to give the illusion of smooth, continuous motion. However, at the moment the loop will run as fast as it possibly can. If you have a very fast computer, and a simple game, the loop might run hundreds of times a second. If you have a slower computer and a more complex game, it might only manage 25 frames a second.
If we move the mouse by a fixed amount each time through the loop, the speed of the ball would depend on how fast the computer managed to run. On a fast computer, the ball might whizz around so quickly that nobody could play the game at all, and on a slow machine the ball might crawl around so slowly that the game wasn't challenging at all.
How do we make the experience the same on any computer? We use a clock to measure actual time. Here is a modified main loop with the clock:
clock = pg.time.Clock() # Create the clock

while game.running:

    # Check all events in queue
    for event in pg.event.get():

        # If a quit event occurs, reset running flag
        if event.type == pg.QUIT:
            game.running = False

    delta_time = clock.tick(60) # Wait for 1/60th of a second
    screen.fill((0, 0, 0))
    game.all_sprites.update(delta_time)  # Update sprites based on actual time
    game.all_sprites.draw(screen)
    pg.display.flip()
First, before the loop starts, we create a pg.time.Clock().
Then, inside, we check the time:
delta_time = clock.tick(60)
This tells Pygame that we want to try to run the game at 60 frames per second.
Every time we call tick, it will check how long had passed since the last time it was called, and it will pause the game until at least one-sixtieth of a second has passed. It will return delta_time, the actual time passed.
On a fast computer, the loop takes a lot less than a 60th of a second to run, so the tick function will pause the game until a 60th of a second has gone by. This means that the game will never run faster than 60 times a second.
The tick function returns the actual time since the last tick, in milliseconds (thousandths of a second). A 60th of a second is 16.666 milliseconds. tick returns an integer which will never be less than 16 and might sometimes be longer (for example if the computer was doing something else in the background).
On a slow computer that can only manage 25 frames per second, every time the tick function is called more than a 60th of a second will already have passed, so the function will return immediately. The return value will normally be 40 (40 milliseconds is a 25th of a second) but again could sometimes be more if the computer was doing something else in the background.
This new version of the loop also includes a call to game.all_sprites.update which ultimately allows the ball sprite to update its position. delta_time is passed into this function so the ball sprite knows how long has passed since it last updated its position. It can take this into account meaning that the ball will move at the same speed on an ultra-fast computer or a really slow computer. It will just look a bit less smooth on the slow computer.
Final main code
Here is the final code for the main module:
from dataclasses import dataclass

import pygame as pg
from sprites import Ball, Bat

@dataclass
class Game:
    screen_width = None
    screen_height = None
    left = None
    right = None
    top = None
    bottom = None
    ball_sprite = None
    bat_sprite = None
    all_sprites = None
    running = None

game = Game()

# Setup game

game.screen_width = 640
game.screen_height = 480

# Initialise pygame
pg.init()

# Set display size
screen = pg.display.set_mode((game.screen_width, game.screen_height))

# Create rectangles at the boundaries of the screen

game.left = pg.Rect(-100, 0, 100, game.screen_height)
game.right = pg.Rect(game.screen_width, 0, 100, game.screen_height)
game.top = pg.Rect(0, -100, game.screen_width, 100)
game.bottom = pg.Rect(0, game.screen_height, game.screen_width, 100)

# Set window title
pg.display.set_caption('Pong')

# Create sprites

game.ball_sprite = Ball((100, 200), game)
game.bat_sprite = Bat((200, 400), game)
game.all_sprites = pg.sprite.RenderPlain()
game.all_sprites.add(game.ball_sprite)
game.all_sprites.add(game.bat_sprite)

# Game loop

game.running = True

# Start the clock
clock = pg.time.Clock()

while game.running:

    # Check all events in queue
    for event in pg.event.get():

        # If a quit event occurs, reset running flag
        if event.type == pg.QUIT:
            game.running = False

    delta_time = clock.tick(60)
    screen.fill((0, 0, 0))
    game.all_sprites.update(delta_time)
    game.all_sprites.draw(screen)
    pg.display.flip()
Updating the ball sprite position
The final piece in the puzzle is how we update the ball sprite.
If you remember from step 1, the ball sprite has an update method that we left unimplemented. Well, each time we call game.all_sprites.update, it calls the update method of all the sprites, passing delta_time.
Here is how we might update the ball sprite (in sprites.py):
class Ball(pg.sprite.Sprite):

    def __init__(self, pos, game):      # Added game parameter
        super(Ball, self).__init__()
        self.game = game                # Keep a copy of the game parameter
        self.image = pg.image.load('ball.png')
        self.rect = self.image.get_rect()
        self.rect.center = pos
        self.speed = 0.2                     # Speed
        self.direction = pg.Vector2(1, -1)   # Initial direction

    def update(self, delta_time):   # Added delta_time parameter
        self.rect.center += self.direction * self.speed * delta_time
        if self.rect.colliderect(self.game.left):
            self.direction[0] = 1
        if self.rect.colliderect(self.game.right):
            self.direction[0] = -1
        if self.rect.colliderect(self.game.top):
            self.direction[1] = 1
        if self.rect.colliderect(self.game.bottom):
            self.direction[1] = -1
In the __init__ method we have made a few small changes:
- The method now accepts a
Gameobject and stores it asself.gamefor later use. - It sets a
speedvalue of 0.2. - It sets and initial
directionofVector2(1, -1). T vector object stores an x value of 1 and a y value of -1, indicating a direction of 1 unit left, one unit up.
The update method now accepts a delta_time value.
We calculate a new position of the ball by updating the centre of the sprite's enclosing rectangle, rect. Here is the calculation:
self.rect.center += self.direction * self.speed * delta_time
The change in position is the direction vector, multiplied by the speed, multiplied by the elapsed time, delta_time.
The speed value is a factor that allows us to control how fast the ball moves. Since we have a frame rate of 60 frames per second and a direction of (1, -1), the speed value of 0.2 means that the calculation is:
self.direction * self.speed * delta_time = (1, -1) * 0.2 * 16 = (3.2, -3.2)
So the ball will move by about 3.2 pixels in the x and y directions every frame. With a frame rate of 60, this means the ball will move by 192 pixels per second, which is a nice speed for a fairly easy game.
The speed parameter is just a convenient way to control the ball speed. Our frame rate is fixed at 60, our direction is a nice simple (1, -1), and the speed parameter allows us to adjust the actual speed of the ball.
In a more complex game, you might have easy and hard modes, that use a different speeds to make the game more difficult. Or you might even increase the speed during the game so that the ball gets faster and faster as the game progresses.
Bouncing the ball
The ball update method includes code to bounce the ball off the edges of the screen. This code bounces the ball off the left edge:
if self.rect.colliderect(self.game.left):
    self.direction[0] = 1
This code tests for a collision between two rectangles:
self.rect, which is the containing rectangle of the ball sprite.game.left, which is the rectangle we created to mark the left edge of the screen.
If the ball rectangle collides with the left rectangle, it means that:
- The ball is travelling right to left (ie the x
directionis -1). - The ball has just hit the left edge of the screen.
So in response to this, we set self.direction[0] (the x direction) to 1. This reverses the ball in the x direction, causing it to bounce off the edge.
There is similar code to handle the right edge. We also handle the top and bottom edges, changing the y direction.
One more point to note. The ball can hit two edges at the same time if it hits a corner diagonally. For example, it could hit the top and left edges it if hist the top left corner diagonally. Our code will work because it checks for each collision every time, but it is worth checking your logic. But if you "optimised" your code to assume that if it hits one boundary it doesn't need to check any other boundary, you could end up with glitches, such as the ball getting stuck to the edge or passing right through the edge.
Summary
So, in this section we have:
- Used a game object to bring all our state variables together in one place and make them accessible to other parts of the code in a controlled way.
- Looked at the logic required to control the movement of the ball.
- Seen how to use rectangle collisions to bounce the ball off the edges of the screen.
- Uses a clock to ensure that the game always runs at the same speed on fast or slower computers.
- Implemented the
updatemethod of the ball sprite to control its movement.
Related articles
Join the GraphicMaths/PythonInformer Newsletter
Sign up using this form to receive an email when new content is added to the graphpicmaths or pythoninformer websites:

Popular tags
2d arrays abstract data type and angle animation arc array arrays bar chart bar style behavioural pattern bezier curve built-in function callable object chain circle classes close closure cmyk colour combinations comparison operator context context manager conversion count creational pattern data science data types decorator design pattern device space dictionary drawing duck typing efficiency ellipse else encryption enumerate fill filter for loop formula function function composition function plot functools game development generativepy tutorial generator geometry gif global variable greyscale higher order function hsl html image image processing imagesurface immutable object in operator index inner function input installing integer iter iterable iterator itertools join l system lambda function latex len lerp line line plot line style linear gradient linspace list list comprehension logical operator lru_cache magic method mandelbrot mandelbrot set map marker style matplotlib monad mutability named parameter numeric python numpy object open operator optimisation optional parameter or pandas path pattern permutations pie chart pil pillow polygon pong positional parameter print product programming paradigms programming techniques pure function python standard library range recipes rectangle recursion regular polygon repeat rgb rotation roundrect scaling scatter plot scipy sector segment sequence setup shape singleton slicing sound spirograph sprite square str stream string stroke structural pattern symmetric encryption template tex text tinkerbell fractal transform translation transparency triangle truthy value tuple turtle unpacking user space vectorisation webserver website while loop zip zip_longest