Image resizing recipes in Pillow
Categories: pillow

These ImageOps functions provide methods to resize images.
expand
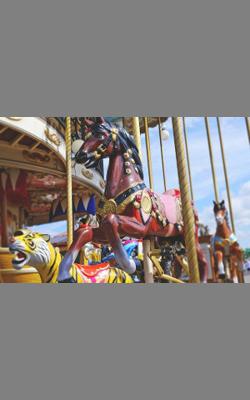
The expand function adds a solid colour border around the image, like this:
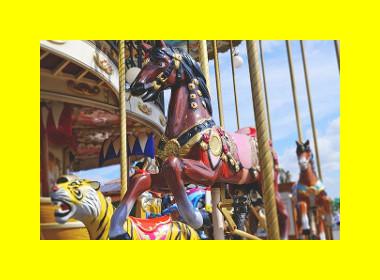
In this case we have added a yellow border that is 40 pixels wide. This means that the width and height of the new image are both increased by 80 pixels.
expand accepts a single parameter for the border width, so the four borders will always have equal widths.
The image inside the borders is pixel-for-pixel identical to the original.
Here is the code:
from PIL import Image, ImageOps
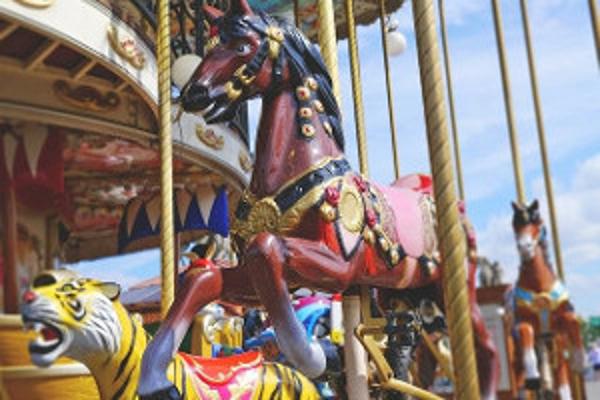
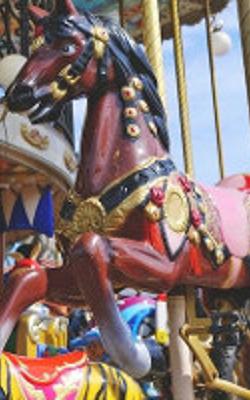
im = Image.open('carousel-small.jpg')
im = ImageOps.expand(im, 40, 'yellow')
im.save('imageops-expand-40.jpg')
expand has the following signature:
ImageOps.expand(image, border=0, fill=0) # returns a new image
imageis the original image.bordergives the width of the border in pixels, and the same width is used on all 4 sides of the image.fillgives the colour of the border (defaults to black if not supplied)
crop
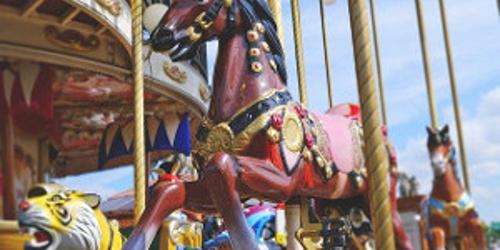
crop removes a band of pixels from the each of the 4 sides of the image, leaving just the central part, like this:
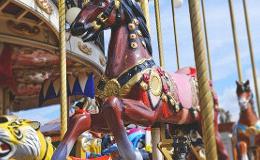
In this case we have removed a 20 pixel band from each edge. This means that the width and height of the new image are both decreased by 40 pixels.
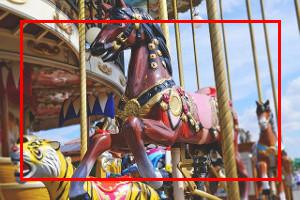
This diagram shows the original image, and the red rectangle indicates the boundary that is cropped:
crop accepts a single parameter for the crop width, so the top, bottom, left and right will all be cropped by the same amount.
The remaining image corresponds to the central part of the original image.
Here is the code:
im = Image.open('carousel-small.jpg')
im = ImageOps.crop(im, 20)
im.save('imageops-crop-20.jpg')
crop has the following signature:
ImageOps.crop(image, border=0) # returns a new image
imageis the original image.bordergives the width of area to be removed, in pixels. The same width is used on all 4 sides of the image.
scale
scale increases or decreases the size of the image by a scale factor. Here is an example of scaling the image by a factor of 2. The new image has twice the width and twice the height, and the image content is scaled to match:
Here is the code:
im = Image.open('carousel-small.jpg')
im = ImageOps.scale(im, 2)
im.save('imageops-scale-2.jpg')
Here is another example, again using the original image, with scale factor of 0.5. This creates an image with that is half the width and height:

The code is the same as the previous example, but with a scale factor of 0.5 passed in to the scale function.
scale has the following signature:
ImageOps.scale(image, factor, resample=3) # returns a new image
imageis the original image.factoris the scaling factor to be applied.resamplespecifies the resampling method to be applied, see below.
Whenever we scale, rotate or apply other transformations to a pixel image, problems such as jagged edges and other unwanted effect can occur. We can apply a filter to reduce these effects. By default, Pillow uses a bicubic filter, which usually does a pretty good job. The resample parameter allows us to choose one of several other filters instead. See the section on filters for more information.
pad
The 'pad' function allows you to change the shape of an image, without stretching or distorting the image. It does this by scaling the image so it fits the required size, and then adding padding to the image as necessary.
Specifically, pad scales the image to be as big as it can be while still fitting in the target size. Depending on the image size and the target size it will either:
- add padding to the top and bottom of the image or
- add padding to the left and right of the image
It will never do both, because the image will always be scaled so that it either fills the width or fills the height.
Here is the first example. Our original image is 300 by 200 pixels, and we want to pad it to make it 500 by 250 pixels:

Here is how this works:
- The image is first scaled to the largest size that fits inside the required 500 by 250 space. The image is scaled up by 20%, so that the new image size is 375 by 250 pixels. It is exactly the right height, but not quite wide enough.
- Next, the image is padded to 500 by 250 pixels by adding extra grey pixels to the left and right, so the original image is centered in the new space.
In this second example, the same original image is padded to a size of 250 by 400 pixels:
This time:
- The image is first scaled down by a factor of 5/6, so that the image is 250 by 167 pixels. It is exactly the right width, but not tall enough.
- Next, the image is padded to 250 by 400 pixels by adding extra grey pixels to the top and bottom, so again the original image is centered in the new space.
As you can see, mode of operation depends on the aspect ration (ie width/height) of the original image size compared to the target size:
- If the original aspect ratio is less than the target aspect ratio, the original is scaled to fit the target height, then padded to fit the target width.
- If the original aspect ratio is greater than the target aspect ratio, the original is scaled to fit the target width, then padded to fit the target height.
- If the original aspect ratio is equal to the target aspect ratio, the original is the same shape as the target, so it can be scaled to fit with no padding required.
Notice pad never applies padding to both the width and height.
Here is the code to pad the image to 500 by 250:
im = Image.open('carousel-small.jpg')
im = ImageOps.pad(im, (500, 250), color='grey')
im.save('imageops-pad-500-250.jpg')
pad has the following signature:
ImageOps.pad(image, size, method=3, color=None, centering=(0.5, 0.5)) # returns a new image
imageis the original image.sizeis the target size, a tuple (or other sequence) of two integers (width, height).methodspecifies the resampling method to be applied, see thescalefunction or filters article. Default is bicubic.coloris the colour to use as the background when the image is padded, default is black.centeringcontrols the position of the image, a tuple (or other sequence) of two numbers (x, y). Defaults to (0.5, 0.5), described below.
Centering
The centering parameter controls where the image is placed within the target rectangle. It consists of a tuple of two values, (x, y).
The x value determines how the image will be placed horizontally in cases where horizontal padding is used. For example the default value of 0.5 means that 50% of the required padding is placed on the left of the image, and 50% is placed to the right of the image. The padding ie equal on both sides so the image will be centred horizontally.
Similarly, the y value determines how the image will be placed vertically in cases where vertical padding is used. The default value of 0.5 means that 50% of the required padding is placed above the image, and 50% is placed below the image. The image will be centred vertically.
We will now look at an example where the centering is set to (0.8, 0.3). For cases where horizontal padding is used, the value of 0.8 means that 80% of the padding is on the left, 20% on the right, like this:
For cases where vertical padding is used, the value of 0.3 means that 30% of the padding is at the top, 30% at the bottom, like this:

You can place the image at the top left using (0, 0), or at the bottom right using (1, 1), and so on.
fit
The 'fit' function allows you to change the shape of an image, without stretching or distorting the image. It does this by scaling the image so it compoletely fills the required size, and then cropping the image as necessary.
Specifically, fit scales the image to be the smallest size that completely fills the target size. Depending on the image size and the target size it will either:
- crop the top and bottom of the image or
- crop the left and right of the image
It will never do both, because the image will always be scaled so that it either fits the width or fits the height.
This function is similar to pad in that it changes an image into a new size. But whereas pad shows the entire image and pads any gaps, fit just fills the space with as much of the image as possible, cropping rather than padding padding.
Here is an example. Our original image is 300 by 200 pixels, and we want to fit it to make it 500 by 250 pixels. This is similar to the first pad example above:
Here is how this works:
- The image is first scaled to the smallest size that completely fills the required 500 by 250 space. The image is scaled up by 2.5 times, so that the new image size is 500 by 750 pixels. It is exactly the right width, but too tall.
- Next, the image is cropped to 500 by 250 pixels by removing pixels at the top and bottom, so the original image is centred in the new space.
In this second example, the same original image is fitted to a size of 250 by 400 pixels:
This time:
- The image is first scaled up by a factor of 2, so that the image is 600 by 400 pixels. It is exactly the right height, but too wide.
- Next, the image is cropped to 250 by 400 pixels by adding extra grey pixels to the top and bottom, so again the original image is centered in the new space.
Similar to pad, the result depends on the aspect ration (ie width/height) of the original image size compared to the target size:
- If the original aspect ratio is less than the target aspect ratio, the original is scaled to fit the target width, then cropped to fit the target height.
- If the original aspect ratio is greater than the target aspect ratio, the original is scaled to fit the target height, then cropped to fit the target width.
- If the original aspect ratio is equal to the target aspect ratio, the original is the same shape as the target, so it can be scaled to fit with no cropping required.
Notice fit never applies cropping to both the width and height.
Here is the code to fit the image to 500 by 250:
im = Image.open('carousel-small.jpg')
im = ImageOps.fit(im, (500, 250))
im.save('imageops-fit-500-250.jpg')
fit has the following signature:
ImageOps.fit(image, size, method=3, centering=(0.5, 0.5)) # returns a new image
imageis the original image.sizeis the target size, a tuple (or other sequence) of two integers (width, height).methodspecifies the resampling method to be applied, see thescalefunction or filters article. Default is bicubic.centeringcontrols the position of the image, a tuple (or other sequence) of two numbers (x, y). Defaults to (0.5, 0.5).
centering works in the same way as for pad, but it is a little less obvious because there is no padding visible. As an illustration, we will take the previous case of fitting to (500, 250) but with centering of (0, 0):

The image is cropped such that the top left of the original image appears in the top left of the output image.
Here is the same example with centering of (1, 1):

This time the image is cropped such that the bottom right of the original image appears in the bottom right of the output image.
Related articles
Join the GraphicMaths/PythonInformer Newsletter
Sign up using this form to receive an email when new content is added to the graphpicmaths or pythoninformer websites:
Popular tags
2d arrays abstract data type and angle animation arc array arrays bar chart bar style behavioural pattern bezier curve built-in function callable object chain circle classes close closure cmyk colour combinations comparison operator context context manager conversion count creational pattern data science data types decorator design pattern device space dictionary drawing duck typing efficiency ellipse else encryption enumerate fill filter for loop formula function function composition function plot functools game development generativepy tutorial generator geometry gif global variable greyscale higher order function hsl html image image processing imagesurface immutable object in operator index inner function input installing integer iter iterable iterator itertools join l system lambda function latex len lerp line line plot line style linear gradient linspace list list comprehension logical operator lru_cache magic method mandelbrot mandelbrot set map marker style matplotlib monad mutability named parameter numeric python numpy object open operator optimisation optional parameter or pandas path pattern permutations pie chart pil pillow polygon pong positional parameter print product programming paradigms programming techniques pure function python standard library range recipes rectangle recursion regular polygon repeat rgb rotation roundrect scaling scatter plot scipy sector segment sequence setup shape singleton slicing sound spirograph sprite square str stream string stroke structural pattern symmetric encryption template tex text tinkerbell fractal transform translation transparency triangle truthy value tuple turtle unpacking user space vectorisation webserver website while loop zip zip_longest